Formats
How to convert PNG to WebP
PNG is reliable but heavy. Converting to WebP typically cuts the file size sharply while keeping transparency and working in nearly every browser.
Last updated July 23, 2026
Why convert PNG to WebP
PNG is a great format for exact, lossless graphics — but that reliability comes with weight. A full-color PNG stores every pixel with no compression trade-offs, which is why screenshots and exported illustrations so often land at several megabytes. WebP was designed to fix exactly that: it packs the same image far more efficiently, and it does everything PNG does that you actually care about.
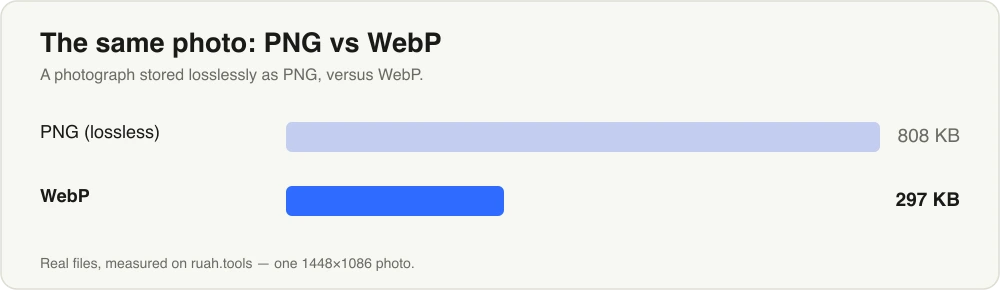
A photographic PNG converted to WebP — the same image, well under half the size.
The three reasons to make the switch:
- Much smaller files. For most PNGs, WebP lands 25–50% smaller, and often more for busy or photographic images — with no visible difference.
- Transparency is kept. WebP supports a full alpha channel, so logos, icons, and cutouts stay transparent exactly as they were in the PNG.
- Near-universal support. Every current browser — Chrome, Edge, Firefox, Safari — decodes WebP, so it’s safe as a drop-in replacement on the web today.
WebP lossy vs lossless
WebP comes in two modes, and picking the right one is the whole decision.
| Mode | What it does | Size drop | Best for |
|---|---|---|---|
| Lossy | Removes detail the eye can’t detect | Large | Photos, detailed illustrations, screenshots of real scenes |
| Lossless | Repacks pixels with no change | Moderate | Logos, icons, line art, flat graphics with a few colors |
For most PNGs, lossy WebP at a high quality setting gives the biggest win while looking identical. The exception is flat graphics with sharp edges and few colors — a logo or an icon — where lossless WebP keeps every edge crisp and still comes out smaller than the original PNG. If you’re weighing WebP against the newer AVIF format, the WebP vs AVIF guide breaks down when each one pulls ahead.
How to convert in your browser
You don’t need to upload anything to a server or install software. The whole conversion runs on your own device, so your images never leave your computer.
- Open the converter and drop your PNG files in — or drag a whole folder of them.
- Pick WebP as the output format.
- Adjust the quality slider. Start high (around 80–90); the file usually gets much smaller with no visible change. Nudge it down if you want to squeeze harder and watch the preview.
- Download. You get a WebP for each image, ready to use.
Batch conversion is supported, so you can drop in dozens of PNGs at once and export them all in a single pass. Because everything is processed locally, a big batch stays private and there’s no upload to wait on.
When to keep the PNG instead
WebP is the right default for the web, but a few cases still call for the original PNG:
- You’ll keep editing the image. Each lossy re-encode stacks a little quality loss. Keep a PNG master, do your edits there, and export WebP as the last step.
- You need maximum compatibility with very old software. Some legacy desktop apps, older email clients, and dated print or design tools don’t read WebP. If a file has to open there, PNG (or JPG) is the safer bet.
- The graphic is already tiny. A small flat icon that’s only a few kilobytes as PNG may not shrink meaningfully, and lossless PNG is already exact.
A note on inputs: the converter works with PNG, JPG, WebP, AVIF, and static GIF. HEIC files from iPhones are not supported, so convert those to PNG or JPG first if you need to bring them in.
A quick workflow
For a page full of images, convert everything to WebP at quality 80 and check the results. If a specific logo or diagram shows soft edges, re-export just that one as lossless WebP. If you want to push the largest photos even smaller, try AVIF on those and compare. Keep your PNG originals somewhere safe so you always have an exact copy to re-export from.
Ready to shrink your PNGs? Open the converter and drop a few in.
Try it now — Convert in your browser, nothing uploaded.