Compression
How to compress images without losing quality
There are two ways to shrink an image, and only one of them touches quality you can actually see. Here is how to get much smaller files that still look identical.
Last updated August 1, 2026
What “without losing quality” actually means
Almost every image can be made dramatically smaller with no visible change — the catch is that “no visible change” and “not a single byte altered” are two different promises. Understanding which one you need is the whole game.
| Type | What it changes | Size drop | Looks the same? |
|---|---|---|---|
| Lossless | Nothing in the pixels — only how they’re stored | Small to moderate | Pixel-for-pixel identical |
| Visually lossless (tuned lossy) | Removes detail the eye can’t detect | Large | Identical to your eye, not to a diff tool |
| Ordinary lossy | Trades visible detail for size | Very large | Softer, artefacts if pushed |
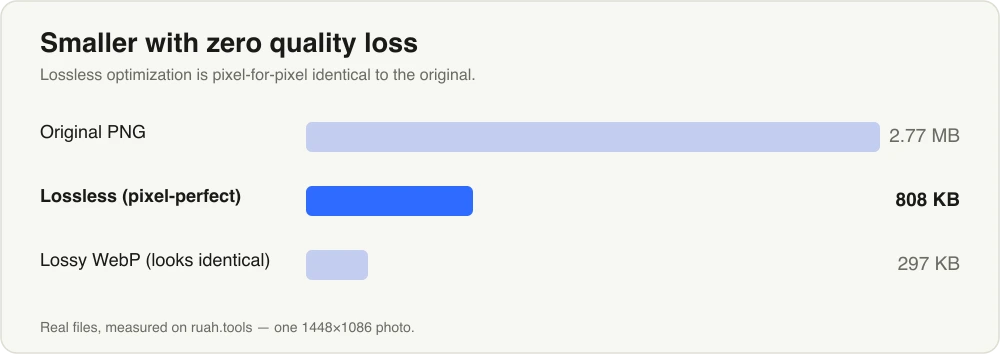
The same photo, three ways. Lossless optimisation changes no pixels at all; a tuned lossy setting goes further with no change you can see.
The three-row split matters because most people only picture the first and last. The middle row — lossy tuned so carefully that the loss falls below what your eye resolves — is where the biggest safe savings live, and it’s the one worth understanding.
Lossless: same pixels, tighter packaging
Lossless compression rewrites the file more efficiently without altering a single pixel. A PNG saved straight out of a design tool often carries redundant data; re-optimising it (the job a tool like OxiPNG does) can shave 10–20% with a guarantee that the image is byte-for-byte identical when decoded.
Under the hood a PNG optimiser does two jobs, neither of which touches a pixel. First it tests different row filters — small per-line predictions that record each pixel as the difference from its neighbour — and keeps whichever leaves the most repetitive data. Then it re-runs the DEFLATE compressor far harder than the original export bothered to. Both steps just find a shorter way to describe the same pixels, which is exactly why the file still decodes to an identical image.
It’s the right choice when exactness matters — a logo with flat colours, a screenshot with text, a diagram, or anything you might edit again later. The downside: on a detailed photograph there’s little redundancy to remove, so lossless alone rarely gets you a big win.
Lossy, but invisible: where the real savings live
This is the part most people miss. A full-colour PNG stores up to 16 million possible colours per pixel — far more than your eye can distinguish in a single image. Colour quantisation reduces that to a carefully chosen palette (up to 256 colours) and adds subtle dithering, and for most images the result is indistinguishable from the original while being 40–70% smaller.
This is exactly the technique behind popular “tiny” PNG compressors. It’s technically lossy, but tuned so the loss falls below what human vision can pick up. For photographs and rich illustrations, it’s almost always the setting you want.
When lossless is off the table
Some size drops are simply not available losslessly, and it helps to know where the line sits. The moment you convert a photo to JPEG, lossy WebP, or AVIF, you have changed pixels by definition — those formats earn their savings precisely by discarding detail your eye won’t miss. Reducing a full-colour image to a 256-colour palette is the same bargain: the quantisation is the saving, so a genuinely untouched copy isn’t on the menu. None of that is a problem for a photograph; the mistake is expecting a byte-perfect result and a large saving from the same pass. Decide which guarantee you need first — identical pixels or smallest invisible file — and the right mode picks itself.
Format still matters: PNG vs WebP lossless
Lossless isn’t limited to PNG. WebP has a lossless mode that keeps every pixel exactly as PNG does, but stores them with a more modern compressor, and it typically lands 20–30% smaller than an already-optimised PNG — with full alpha transparency intact. For a logo, an icon set, or a UI screenshot you want pixel-perfect but light, exporting lossless WebP is often the single biggest win on offer. The one catch is reach: some very old software still won’t open WebP, so keep PNG for assets that must open anywhere. Convert moves between the two without throwing away quality, and WebP vs AVIF covers the lossy side of the same choice.
How to compress in your browser
You don’t need to upload anything to a server to do this. Drop your images into the browser-based compressor and it applies smart lossy compression by default — the same quantisation described above — so you get the big size drop automatically. Everything runs on your device.
If you need the exact-pixels guarantee, flip on the Lossless toggle. Ruah hides the quality slider for PNG on purpose: instead of making you guess a number, it gives you the two choices that actually matter — smallest-but-invisible, or perfectly exact. For other formats the quality slider stays, so you can dial a high-quality lossy JPEG or WebP when that’s the smarter trade.
When to choose lossless anyway
Reach for the Lossless toggle when:
- The image is a logo, icon, or line art with a few flat colours — these are already tiny and lose nothing, so there’s no reason to quantise.
- You have smooth gradients (a sky, a soft shadow) where 256 colours could introduce faint banding.
- The file will be edited further and you don’t want to stack compression passes.
For everything else — photos, screenshots of real scenes, detailed artwork — the default lossy mode gives you a much smaller file that looks the same.
One more free win: strip the metadata
Photos often carry hidden EXIF data — camera model, settings, even GPS coordinates. Removing it shrinks the file a little and, more importantly, protects your privacy. You can do that losslessly with the metadata remover, no re-encoding required.
The short version
Decide which promise you need before you touch a slider. For photos and busy artwork, the default lossy mode gives a file 40–70% smaller that your eye can’t tell apart. For logos, flat graphics, and anything you’ll edit again, flip on Lossless — and consider lossless WebP to go smaller still. Strip the metadata for a free, safe trim on top. When dimensions and format are also in play, how to reduce image file size walks through all three levers together.
Try it now — Compress in your browser, nothing uploaded.