AI
How to optimize AI-generated images for the web
Midjourney, DALL·E and Stable Diffusion hand you a heavy multi-megabyte PNG. Here is how to make it web-ready — smaller, the right format, and the right size — without uploading it anywhere.
Last updated August 1, 2026
Why AI images need optimizing at all
Image generators are tuned for quality, not delivery. A single render from Midjourney, DALL·E, Stable Diffusion or ChatGPT typically comes out as a full-colour PNG at 1024×1024 or larger, often several megabytes. That’s fine for archiving, but drop it straight onto a website, a product listing, or a social post and it will load slowly and eat bandwidth.
The good news: AI images compress extremely well, because they’re usually clean, detailed, and have no format optimization applied yet. A few seconds of processing can cut them by 70–90% with no change you can see — and you can do all of it in your browser, without uploading your generations to another company.
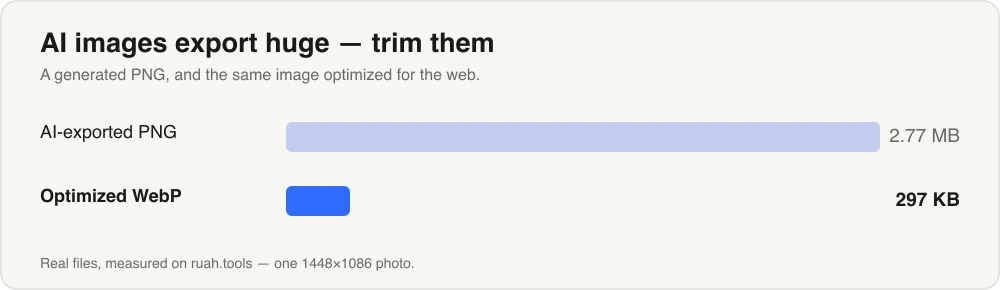
A real example — the demo photo in this guide is itself AI-generated. Optimized for the web, it drops about 90%.
1. Compress the heavy PNG
Start here. A generated PNG stores far more colour information than the eye can use. Smart lossy compression reduces it to an optimized palette and typically lands 60–80% smaller while looking identical. If the image has smooth gradients you want to keep perfect, switch to the lossless mode instead.
2. Convert to a modern format
PNG is rarely the best format for shipping an AI image. Converting to WebP usually saves another big chunk with universal browser support; AVIF saves even more for modern browsers. For a photo- realistic render, AVIF often produces the smallest file at the same quality. If you need maximum compatibility instead — an older CMS, a print shop’s uploader, an email attachment — a high-quality JPG is still the safe universal choice, as long as the image has no transparency to preserve.
→ Convert to WebP, AVIF or JPG
3. Remove the background (when you need the subject alone)
If you generated a product, character, or object and want it on a transparent background — for a store page, a sticker, or compositing into another scene — an on-device AI model can cut it out and export a transparent PNG in seconds.
4. Resize for where it’s going
A 2K render is overkill for most destinations. Downscaling to the exact target keeps things sharp and slashes the file size. Common targets:
| Destination | Suggested size |
|---|---|
| Instagram post (square) | 1080 × 1080 |
| Instagram / TikTok story | 1080 × 1920 |
| X / Twitter, blog header | 1600 × 900 |
| Video thumbnail | 1280 × 720 |
| Web hero image | 1600–2000 px wide |
| Product thumbnail | 600 × 600 |
5. Upscale when the render is too small
Sometimes the problem is the opposite of a heavy file: the generation came out small. Older Stable Diffusion checkpoints default to 512 × 512, a free tier may cap the output resolution, or you cropped in tight and now have only a few hundred pixels of subject. Downscaling gains you nothing here, and a plain resize upward just smears the pixels you already have.
This is the one case where enlarging is the right move — but do it with the AI upscaler, not a resizer. It reconstructs plausible detail with a trained model instead of interpolating, so a small render becomes a usable one: ×2 for a modest, clean bump, ×4 to rescue a genuine thumbnail. Clean AI renders are exactly what the model handles best.
Print is the other reason to reach for it. A screen looks sharp at 72–96 pixels per inch, but a crisp print wants around 300 — so a 1024 px render is only about 3.4 inches wide on paper before it starts to soften. A ×4 pass gives you the pixel count a decent print size actually needs. I won’t repeat the mechanics here — how AI image upscaling works covers when it helps, where it can’t, and why it runs in seconds on a GPU.
6. Strip the embedded metadata
This is the step most people forget, and for AI images it matters more than for ordinary photos. Many tools write text straight into the file: Automatic1111 and ComfyUI save your full prompt, negative prompt, seed, sampler and model name into the PNG’s text chunks, and several hosted generators add their own tags on top. None of it shows in the picture, yet anyone who opens the file can read it — so shipping a raw render can quietly hand over your prompt wording, an unreleased project name, or a client’s brief.
Remove metadata cuts those PNG text chunks out — along with any EXIF, XMP or IPTC block — losslessly: the pixels are copied through byte for byte, nothing is re-compressed. You only need it as a separate step when you’re shipping the original PNG untouched, because converting, compressing or resizing already drops the metadata as a side effect of re-encoding.
Putting it in the right order
The steps above aren’t a fixed checklist — use the ones your image needs — but when you chain several, the order changes the result. A reliable default:
- Isolate the subject first, if you need it alone: remove the background while you still have the most pixels to work with.
- Get the size right next — resize down for a web target, or upscale if the render is too small for where it’s going. Sizing before compressing means you never spend bytes on pixels you’re about to discard.
- Convert to WebP or AVIF and let the quality setting handle most of the compression in a single step.
- Compress with Compress afterwards if you’re keeping PNG, or to squeeze out the last few bytes.
If you’re shipping the original PNG unchanged rather than a converted copy, add one final step — strip the metadata — so no prompt data travels with the file.
Nothing you generated leaves your device
Every step above runs locally in your browser with WebAssembly and WebGPU. Your renders — and any prompt data carried inside them — are never uploaded. That matters if you’re working on unreleased designs, client work, or anything you’d rather not hand to a third-party server just to make it smaller.
One boundary worth stating plainly: these tools are for optimizing your images. They don’t remove visible watermarks, and they aren’t meant to disguise that an image was generated by AI.
Try it now — AI image toolkit in your browser, nothing uploaded.