Editing
How to resize an image without losing quality
Making an image smaller keeps it looking sharp; making it bigger cannot invent detail that was never there. Here is how to resize the right way and get a clean result every time.
Last updated July 23, 2026
Downscaling is safe — upscaling is a different promise
The single most useful thing to know about resizing is that shrinking and enlarging are not two directions of the same operation. When you downscale, you have more pixels than you need, so the tool discards information intelligently and the result looks crisp. When you upscale, you’re asking for pixels that were never captured — and no resizer can truly recover detail that isn’t in the file.
| Direction | What happens | Result |
|---|---|---|
| Downscale (bigger to smaller) | Extra detail is averaged down carefully | Stays sharp, looks great |
| Upscale (smaller to bigger) | Missing pixels are guessed by interpolation | Softer, can look mushy |
So the honest rule: resize down from the largest original you have, and you’ll keep quality.
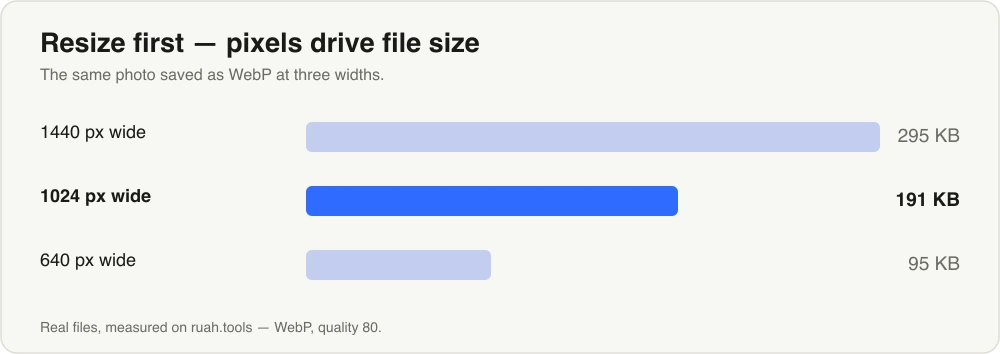
Downscaling also shrinks the file — the same photo saved as WebP at three widths. Pixel count drives size more than anything else.
Ruah’s resizer won’t fabricate texture or edges that were never in your photo, so enlarging with it gives a softer result. When you genuinely need to make something bigger, that’s a job for a different tool: the AI upscaler reconstructs plausible detail instead of just interpolating it — here’s how AI upscaling works. Either way, start from the highest-resolution source you can find rather than a small copy.
Always keep the aspect ratio
Aspect ratio is the relationship between width and height. Change one without the other and your image stretches — faces widen, circles turn into ovals. Keep width and height locked together so the proportions stay true. On Resize this is the default: set one dimension and the other follows automatically. Only unlock it when you deliberately want a different shape, and even then prefer to crop rather than squash.
Choose a target: exact pixels or a percentage
There are two clean ways to say how big you want the result, and each fits a different job.
- Exact pixel size — when there’s a number you have to hit. A forum avatar capped at 512 px, a blog header that should be 1600 px wide, an upload limit measured in pixels. Type the dimension and you’re done.
- Percentage — when you just want smaller without a specific target. “Half the size” (50%) is a quick, safe way to lighten a batch of photos while keeping everything in proportion.
One safeguard worth turning on: a “don’t enlarge” option. With it enabled, an image that’s already smaller than your target is left alone instead of being blown up and softened. That matters a lot when you’re processing a mixed folder where some files are already small — you get consistent maximum dimensions without accidentally degrading the little ones.
Why the resampling method matters
When a tool removes or adds pixels, it has to decide what color the new grid of pixels should be. That decision is the resampling (or interpolation) method, and it’s the difference between a clean result and a blocky or blurry one. Crude methods like nearest-neighbor leave jagged edges; better ones weigh many surrounding pixels.
Ruah uses Lanczos resampling, a high-quality method that keeps edges and text crisp when downscaling instead of smearing them. You don’t have to configure anything — it’s applied so your smaller image looks like a smaller version of the original, not a soft approximation of it.
Resize a whole batch at once
If you have twenty product photos that all need to be 1200 px wide, you shouldn’t do them one at a time. Drop the whole set into Resize, pick your target size or percentage once, and every file is processed with the same settings — all on your device, nothing uploaded. It handles PNG, JPG, WebP, AVIF, and static GIF. (HEIC from an iPhone isn’t supported, so convert those to JPG or PNG first.)
Resize first, then convert or compress for the smallest file
Resizing and file size are related but separate. Fewer pixels already means a smaller file, but you get the tightest result by chaining steps in the right order:
- Resize down to the dimensions you actually need.
- Convert to an efficient format with Convert — WebP or AVIF instead of JPG or PNG.
- Compress the result with Compress to squeeze out the last bytes.
Doing it in that order means the compressor is working on an already-smaller image, so the final file is as light as it can be. For a deeper look at that last step, see how to reduce image file size.
The short version
Start from your largest original, resize down rather than up, keep the aspect ratio locked, and pick either an exact pixel size or a percentage depending on whether you have a number to hit. Let Lanczos handle the sharpness, run the whole batch in one pass, and convert or compress afterward for the smallest file. Do that and “resize without losing quality” stops being a wish and becomes the default outcome.
Try it now — Resize in your browser, nothing uploaded.